
Input transducer sensitivity calibration
Before you start calibrating your transducer you must make sure the sound card sensitivity and amplification gain and status (checked/unchecked) is correct. Therefore we recommend that you calibrate the sound card sensitivity (see above) before calibrating the transducer sensitivity.
Start the calibration preparation by checking  , and select in the list box the unit of the transducer you are using (for a microphone it would be Pres [Pa]).

Click on the  button shown above to the right of the Transducer sensitivity to display the settings.
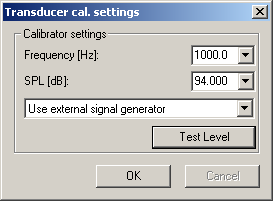
From this dialog box you can set the level and frequency for the calibration, and choose if you want to use an external signal generator or use the sound card output as signal generator. Using the sound card output should be fine as long as you have a device for measuring the level.
If you are to connect a signal generator or a calibrator to your input chain, choose Use external signal generator in the list box. Type the signal generator/calibrator frequency and level in the dialog box.
If you are to use the sound card output as signal generator choose Use sound card output as signal generator (full scale output) in the list box. Select the frequency, 1000 Hz should be fine for most purposes. Then the output signal must be measured in the transducer unit (e.g. SPL) using an external device. Use a SPL meter if you are calibrating a microphone using a loudspeaker. If you click the  button, the output signal is played (End level test can be clicked to stop the playback of the calibration signal). After the
  button is clicked, measure the level using the voltage meter. Type the measured level in the dialog box below the frequency setting and exit the dialog box by clicking
  .
.
Make sure that you have connected the calibration signal to the correct input channel (channel 1 is left).
Now click the  button to perform the calibration. After the calibration is performed, the number to the left and the date to the right of the
  button will be updated with the new settings. Now you can do a measurement to test if the calibration is correct. You can use sinusoid as excitation signal (see How to use a sinusoidal excitation signal?). Please note that if you repeat the calibration, the number may not seem to be changed, but if the date is updated, this is probably because exactly the same number is written.