was selected in step 2. If not, this dialog may look differently
but the principle should be the same.
was selected in step 2. If not, this dialog may look differently
but the principle should be the same.This assumes that was selected in step 2. If not, this dialog may look differently
but the principle should be the same.
Click the  button to start the calibration of your sound card.
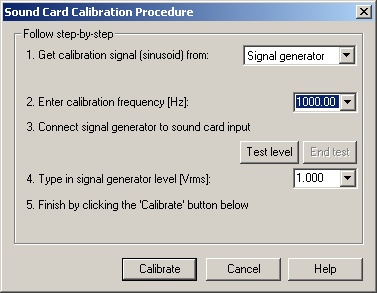
In step 1, select if you want to use an external signal generator or the sound card output as source.
In step 2, select the calibration frequency. If you use an external generator this must be set to sinusoidal signal with the correct frequency.
In step 3 connect the source you have selected to the sound
card input. You might want to click the  button to test the level. If the signal generator output RMS
voltage is not available, you also need to measure this using a RMS voltage
meter.
button to test the level. If the signal generator output RMS
voltage is not available, you also need to measure this using a RMS voltage
meter.
In step 4, enter the measured signal generator RMS voltage.
In step 5, click the  button. This will check that the level is sufficient and the
distortion is not too high. If this is OK; the sound card calibration is
finished, the dialog box is closed and the calibration time and date is written
in the Input level calibration dialog
button. This will check that the level is sufficient and the
distortion is not too high. If this is OK; the sound card calibration is
finished, the dialog box is closed and the calibration time and date is written
in the Input level calibration dialog