was selected in step 2. If not, this dialog may look
differently.
was selected in step 2. If not, this dialog may look
differently.This assumes that was selected in step 2. If not, this dialog may look
differently.
In step 5 you can calibrate to find the sensitivity of your
transducer. If the previous steps have been done
correctly, the sensitivity will be correct. But if the transducer sensitivity is
given you may also use this number. First click the  button so you can type your own
number
button so you can type your own
number
Then type the sensitivity of your transducer as shown below.
If you want to perform the calibration, click the  button to open the dialog shown
below
button to open the dialog shown
below
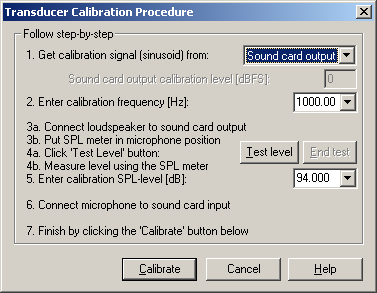
In step 1 select the source of your calibration signal.
We will assume the sound card output is selected and that the transducer is a microphone. If you have access to a calibrator, the procedure is less complicated and is therefore recommended. The procedure described here assumes that you have access to a sound level meter.
In step 2. type the frequency you wish to use. 1000 Hz is typically used.
Follow step 3. The microphone of the sound level meter should be as close as possible to the microphone you use with WinMLS.
In step 4, note that if the input level is too high you can reduce the sound card output calibration level from the value 0 which represents maximum output level.
(This dialog box is not enabled before you click the  button).
In step 5, type in the sound level measured using the sound level meter.