Before measuring you must be sure that the equipment you are calibrating is the equipment you are going to use for the measurement (even the cables should be the same).
Before measuring it is recommended that you calibrate your input chain (microphone, optional amplifier and sound card) e.g. using a calibrator.
If you want your measurements to be completely according to the ISO 3382, you need to measure 29 measurements along a circle around the loudspeaker placed in a free field (in an anechoic chamber or outdoors far above the ground).
Each step should be 360/29 = 12.4 degrees. To simplify the positioning, you can place the loudspeaker on a turntable.
Keep the microphone in the same horizontal plane when doing the calibration measurements.
This procedure can optionally be done automatically from WinMLS since WinMLS can run an executable file after each measurement (see Measurement->Tasks...). The file BKturntable.exe found in the WinMLS folder will control a BK turntable, but only works under Window 95/98. Please contact us if you have or need information about other turntables. The turntable can also be moved manually.
The microphone should be placed up to 10 meters away from the loudspeaker, but 3 meters should be sufficient. Measure the distance you are using and write it down since it may be used for the calculation later.
2. From
Setup->Load..., if you have not
done so already, load the setup named Room Acoustics_Strength (G).
3. Go to
Plot->Plot Type/Routing/Test
and set
the settings shown below to display the Frequency Response Spectrum
plot type in the upper plot.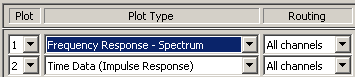
4. Go to
Measurement->Settings.... In the opened dialog box, set Max. decay
time + system delay to 0.4 seconds as shown below. The total duration can be
set to 10 seconds as shown below.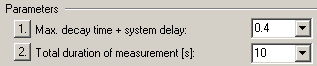
5. Set
WinMLS to Ask after meas. to ask user to save after measurement is
performed as shown below
6. Close
the dialog using the  button.
7. Go to
Measurement->Saving Defaults....
8. In
this dialog select the folder where you want to save your calibration
measurements using the  button and specify a folder and default filename as shown
below.
button and specify a folder and default filename as shown
below.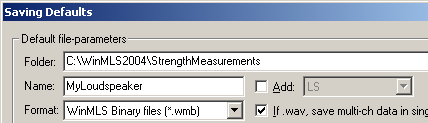
9. In the
bottom part of the dialog, turn on the auto-name counter as shown below. Set it
to stop at 29 measurements if you want to do this strictly according to ISO
3382.
10. Close the
dialog clicking the button.
Go to Setup->Store... and store the
setup under a new name e.g. Room Acoustics_Strength Calibration if you
want to save the settings for later use.
11. Move the
microphone to the desired distance from the loudspeaker. In an anechoic chamber
3 meters will be a good distance to use. Make a note of the distance you are
using.
12. Perform the measurements of each position and save them (you can use File->Save As... to save if you are not asked to save after each measurement). Make sure all measurements are saved in the same folder (which they will be if you dont change the folder during the measurements).
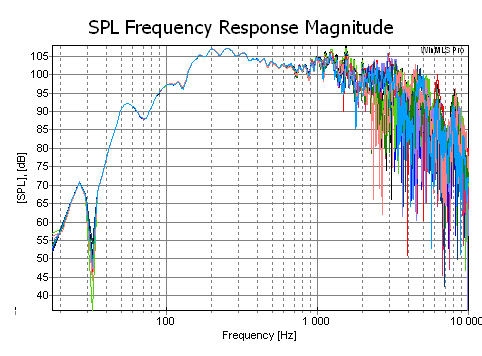
Below is a typical example of a calibration measurement. We see that up to 1000 Hz the curves follow each other which means that it is omni-directional. But above 1000 Hz we see the effects of directivity.
You now have measurements that can be used for calculating the octave bands corrections needed to get the correct calibration. These will only be valid for new measurements if you do not change the output calibration values. Now go to Setup->Load... and reload the setup named Room Acoustics_Strength (G).
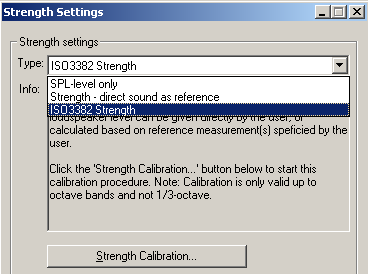
To calculate the octave bands corrections, go to Calculate->Speech->Settings... to open the dialog box shown below.
In this dialog box select ISO 3382
Strength as shown above and then click the  button to open the dialog shown below.
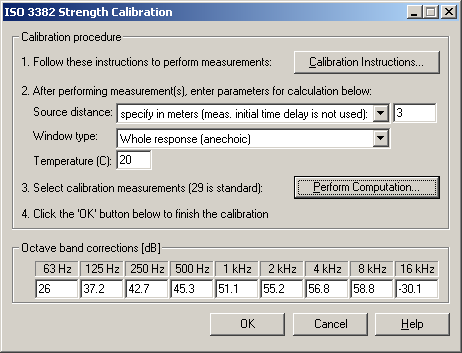
Follow the steps in the dialog box
above. In step 2 you need to either type the distance or you can have WinMLS to
calculate the distance for you. The most safe method is to specify the distance
manually (if you are sure about the value). Click the  button in the dialog above for more
information.
button in the dialog above for more
information.
After completing this procedure, go to Setup->Store... and store the setup.
Now this setup can be used for measuring strength values according to the ISO 3382 standard.
 Contents
 Index
Index Search
 Previous
 Next
Next