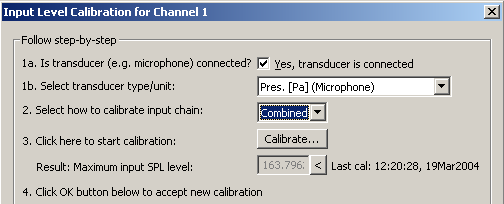
When clicking the  button, you should see the dialog shown below. If you in step 2.
choose to perform a combined calibration
button, you should see the dialog shown below. If you in step 2.
choose to perform a combined calibration  there are only 4 steps, as shown below
Step 1. is explained in the next section.
In step 3. the user can either click the  button and follow the calibration
procedure or type the Maximum input SPL level
manually after clicking the
button and follow the calibration
procedure or type the Maximum input SPL level
manually after clicking the  button.
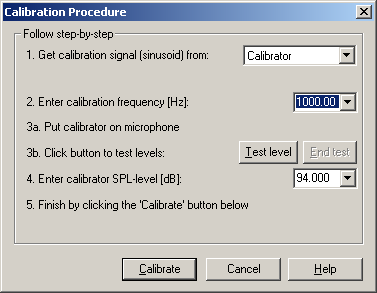
If clicking the button, the dialog shown below is displayed
In step 1, select if you want to use the sound card output or an calibrator as source.
In step 2, select the calibration frequency. If you use an external generator this must be set to sinusoidal signal with the frequency that is set here.
In step 3 connect the source you have selected the input. You
might want to click the  button to test the level. You will be given a warning when
performing the calibration if the level is not set correctly.
button to test the level. You will be given a warning when
performing the calibration if the level is not set correctly.
In step 4, enter the calibrator SPL-level.
In step 5, click the  button. This will perform the calibration and check that the
level is sufficient and the distortion is not too high. If this is OK; the
calibration is finished, the dialog box is closed and the calibration time and
date is written in the Input level calibration dialog
button. This will perform the calibration and check that the
level is sufficient and the distortion is not too high. If this is OK; the
calibration is finished, the dialog box is closed and the calibration time and
date is written in the Input level calibration dialog
 Contents
 Index
Index Search
 Previous
 Next
Next