How to perform absolute calibration of input level?
The purpose of the calibration is to be able to measure the absolute quantity, e.g. voltage or sound pressure level (SPL). To activate input calibration, go to Measurement->Hardware Calibration. In the dialog box, enable the calibration by checking  . To perform a new calibration or view the settings, click on the
  button. Make sure the channel number to the right of the button is set to 1 if you are doing the calibration for one channel measurement. For a multi-channel measurement, each channel has to be calibrated, the procedure is the same as for calibrating channel 1. In the following we describe the procedure for calibrating channel 1.

After clicking the Settings... button shown above, the Input level calibration for channel 1dialog box will be displayed.
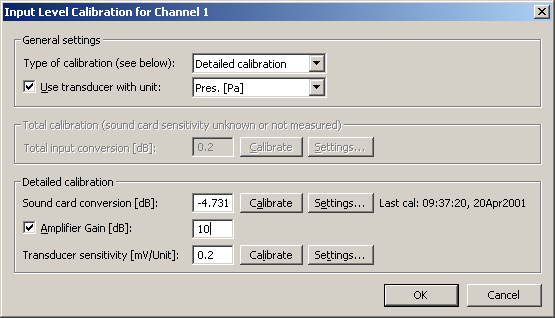
In this dialog box, the upper list box determines if you want to calibrate the whole measurement chain in one operation (Total calibration), or calibrate each part of your measurement system (Detailed calibration) as shown below.

If you intend to calibrate with a transducer (e.g. a microphone) connected to the input, the check box  must be checked. In the list box to the right of the check box, specify the type of transducer. A microphone would get Pres [Pa]. By doing this you will get the correct units during calibration and the correct units on the left axis (y-axis) when plotting measurements.
Make sure that the input and output volume is not too high because this will give clipping of the input signal. It should not be too low either, because this may give unreliable results due to background noise.
Note that if you are using the VXPocket or VX222, there is a special gain setting in the sound card mixer under Advanced Input that can be used to switch the input from Line to Microphone (see the Tested Sound Cards file).
More:
 How to perform Total Calibration?
How to perform Detailed Calibration?