How to perform “Total Calibration”?
The purpose of this type of calibration is to calibrate the whole input chain in one operation. This calibration is fast and simple. However, if you are using WinMLS both for electrical measurements and measurements where you are using a transducer (e.g. a microphone) or a pre-amplifier with changeable gain, we recommend that you instead use the Detailed Calibration (see next section).
If you are not already in the Input level calibration for channel 1dialog box, go there (Measurement->Hardware Calibration, click Settings… to the right of the Input calibration check box.
First make sure that the list box named Type of calibration at the top of the calibration dialog box is set to Total Calibration.

Right below, make sure that you have checked  if you are using a transducer. Select in the list box the unit of the transducer you are using (for a microphone this would be Pres [Pa]).
The settings for the total calibration are shown below:

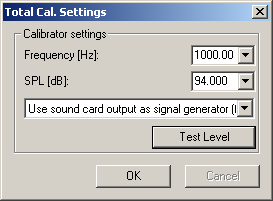
Click the  button to view the Total Cal. Settings dialog box.

From here you can set the level and frequency for the calibration, and choose if you want to use an external signal generator or use the sound card output as signal generator. Using the sound card output should be fine as long as you have something to measure the signal level with (the measured level is used as the reference level), e.g. a voltage meter if you are doing an electrical calibration.
If you are to connect a signal generator or a calibrator to the input, choose Use external signal generator in the list box. Type the signal generator/calibrator frequency and level in the edit boxes.
If you are to use the sound card output as signal generator choose Use sound card output as signal generator (full scale output) in the list box. Select the frequency, 1000 Hz should be fine for most purposes. Then the output signal must be measured with an external device in the unit you wish to do the calibration for. Use a voltage meter if you are doing an electrical calibration and a SPL meter if you are calibrating a microphone using a loudspeaker. The  button should be clicked to test the levels (End level test can be clicked to stop the playback of the calibration signal). After the
  button is clicked, measure the level using the external device. Type the measured level in the dialog box below the frequency setting and exit the dialog box by clicking
  .
.
Make sure that you have connected the calibration signal to the correct input channel (channel 1 is left).
Now click the  button to perform the calibration. After the calibration is performed, the number to the left and the date to the right of the Calibrate button will be updated with the new settings. Now you can do a measurement to test if the calibration is correct. You can use sinusoid as excitation signal (see How to use a sinusoidal excitation signal?). Please note that if you repeat the calibration, the number may not seem to be changed, but if the date is updated, this is probably because exactly the same number is written.
If  is checked, it is assumed that you are using a transducer when doing the level calibration. Note that if this check box is turned off, no warning will be given that you should redo the calibration. If you are going to do a measurement later without using the transducer, a new calibration must be performed.