The sections above have explained how to connect a loop-back. The output signal is always played back in the left channel and the loop-back output signal is played back in the right channel and normally recorded in the right channel.
The main purpose of measuring using this loop-back is to determine the correct delay of the system to be measured (e.g. the distance between the loudspeaker and the microphone). Most sound cards do not start playback and record simultaneously, it is different from one measurement to another. This makes it impossible to find the delay without this loop-back.
Note that the procedure described here is not the same as using the right channel input as reference. The loop in the right channel is in this case only used to find the correct delay by sending out a pulse before the measurement starts. When using right channel as reference, the response of the sound card is corrected for. The advantage with this method is that you can measure two impulse/frequency responses simultaneously.
When using loop-back it is also possible to detect errors in the measurement caused by non-continuous play or record. This is usually only a problem for a slow PC and for certain USB sound cards, but can occur if you run other tasks on your PC while performing a measurement. If such an error is detected, the measurement will be canceled, a new measurement will start and a warning is given in the status bar.
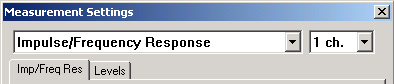
Go to Measurement->Settings and make sure the dialog looks like below.
In this dialog, select Internal as shown in step number 6 below.
Now click the  button as shown below.
In the Delay dialog, select Yes, with loop-back and end-check as shown below.
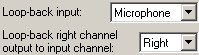
Now select the Loop-back Input you used for connecting the loop-back to. In the figure below Microphone is chosen. Make sure Loop-back right channel output o input channel is set to Right. If WinMLS is not set to control the Window mixer, you cannot set these from WinMLS.
The sound card delay should now be set in samples. We have already measured the sound card delay in the first measurement walk-through. This number can vary from 10-80 samples. After typing this number, click the OK button to exit the dialog.
 Loop-back measurement procedure
This happens during a loop-back measurement
What to do if the loop-back synchronization signal not strong enough
 Contents
 Index
Index Search
 Previous
 Next
Next